Showing posts with label cheap decorations. Show all posts

Wednesday, April 20, 2016

DISTRESS ON THE CHEAP! 5 BUCKS FOR MY TABLE!

I have really enjoyed doing all these house projects because it helps put my brain in the place of happiness..... Yes my kids and hubby do that but sometimes you need this little me time inside yourself especially when you are home all day with 4 kids and homeschooling them... Can I get a Amen Madea?!    O yes, I get that someone may call the PO, PO over here if mama don't get a little quiet time in her head sometimes... LOL
  So anyway, I have taken to redoing the house into a more of a farmhouse style instead of rustic because for 1. it actually is a farmhouse and second because I just really like the style.  So good enough, I found a old coffee table that someone was going to through away.... AHHHH did you hear the angels sing... FREE love those 4 little letters! I had to do some wood working on it cause it was in pretty bad shape, but once I put my little touches to it I was very tickled at how it turned out.

This is the table when I first got it.  It was missing a drawer on one side, had these little shell looking things that I didn't like and it needed a good sanding.


So I just did a rough coat sanding, nothing major.
With a little hand sander.

Next I popped off the shells, they were attached with nails from a nail gun, this took like two seconds.  Then I sanded where they were so stains wouldn't show through.  I had left over Plywood from my shiplap wall... (I'm telling you, this stuff is awesome..if you are the least bit crafty you will use every inch of this stuff and not waste a bit!  I decided I wanted to cover the hole where the drawer was but wanted it to look like that on each side.  Now the plywood is sharpe on the edges and I wanted it to look soft like a real drawer, so I used the little dremel tool and sanded down the edges so it would look real... then I stained them grey and attached them with a nail gun.  
I did this on both sides.

I wanted the black distress to show through the top and since I was out of black spray flat I used some old black chalk board paint from my sons room, cause I didn't need much.  
Then I painted over that with gray paint from my bedroom. lol, I said it was cheap, and I already had all this stuff at the house.  

Once all the grey and white white was painted I used a soft sandpaper and distressed it in the areas that I liked... I also took a soft rag and coated with boiled linseed oil to give it a protective coat. 


 Next I went to Hobby Lobby and purchased some cute knobs that were 50 percent off which was 2.50 a piece to make them look like real drawers, used my husbands drill and made little holes for these.  I thought it was a cute final touch!


I was tickled with how it turned out.  My coffee table that was 5 bucks!!


Sunday, April 10, 2016

DISTRESSED SHIPLAP LOOKING WALL

You know what I really love about Pinterest?  Well besides that fact that your brain can go into this place where you dream you have all this really awesome stuff!
Its the fact that everything is good, no seriously each and every person can have their on taste and you are not judged. You have your own boards and your own styles and its ok to like what "you" want to like.  I have had this really neat thing to happen to me in the last 6 to 8mths.  I have found myself.  Like when I say found myself, I mean that I have never really had a specific taste.  My mom is a great homemaker, my mother-in-law has good taste too.  Lots of people in my family do also.  But it always seems like I have just been lost in the middle.  I would like things that one would do and mix it with something else that I would see at one of the other houses.  I never really said, "Oh this is the style I like and I"m going with it!"  Part of it is because I haven't really focused on it because I have been tending to 4 growing children for 13 years and the focus has for sure been 100 percent on them and not on the mama.

So anyways, I feel like after taking much time and looking though my boards and also watching the show "Fixer Upper" I have finally found a style and taste that I love! So one room at a time I have been changing it to make it match how I would like it look.  The only downer to this process is that I'm not rich like they are on the show so I have to do it with hammy down stuff or look on pinterest to try and find a cheaper way of doing things. A couple of weeks back I had a blog entry on my distressed wall with old boards that my dad had from a box that come off the farm.  Today the wall that I'm writing about I didn't have any old boards so I went  to Lowes hardware and had them to cut me some boards out of some white plywood.  It was around 35.00 for a 4X8 sheet.  I had to have 2 boards. This was my only expense in this project because I was gonna use all the other stuff I had from previous projects to complete it.  
I wish I had taken a picture of all the boards I had gotten at Lowes.  The 4X8 sheet made a lot of boards because I told the guy that run the saw at Lowes that I wanted them cut 4" wide.  The first 3 cuts where free then the rest of the cuts are .25 each. It wasn't very much and the boards are straight and even.  My wall was just a little under 4 feet wide so I only had to cut off a couple inches off each board.

Tools I used:
circular saw
nail gun with air compressor
Vaseline
small Dremel tool (round sander on the end)
grey stain
white flat paint
level

First board, use a stud finder to make sure you have the nails with the nail gun in the right place. Once I found them I drew straight lines up the wall so I would know where they are every time. 


Next Use a Level to make sure your boards are level before laying the rest of the boards.  I only had to do this once. 


I checked both ends, and the middle.

Of course I always have helpers when I'm working.  

This is to show how I used a jig saw and cut out the squares for the electric sockets. 


This was the hard part for me because I'm not a carpenter by any stretch.  It was getting around the steps. I cut out a small square with the circular saw, then used a Dremel tool with a round sander on the end to make it smooth.  This took me awhile because I had never done it before. 


Another thing I didn't figure for was the fancy crown molding at the top. Oh my Word, Can you say pain in the neck!!!! It took for ever using that small sanding tool to make it all go together.  But I was very proud of how it finished.  ***Key Point I didn't think about that at the top when I started my project.  So make sure you look at your wall before you start something like this to make sure you can maneuver around what ever you have on that wall.
Once I finished the wall, I did the same method I did here. (that tells about the stain, Vaseline method for the distressed look to come through. Once you do that, you paint over with flat white paint.  I used 2 coats. 

You lightly sand in the areas you want the distressed look to appear. 

So this is the finished project! I had a old lantern that I took the oil part out of a used a battery light to put on the inside.  I purchased the large metal K at "of course" Hobby Lobby.

This is a up close because the long picture you really loose how pretty the distressed part is.  Its hard to tell from the bottom pictures.

This is with little light on in the lantern.


This is with the light on.


Friday, March 18, 2016

DISTRESSED COFFEE TABLE


Happy Weekend Everyone!

So I have finally caught up on a lot of projects that I've been doing around the house so I'm planing to make a couple of post here in the next few days to show what all we have been working on.  

I'm trying to redo a lot in my house to go to the white, gray, farmhouse style.  I had somewhat the farmhouse style already, but was with more of the reds, greens and hickory style type furniture.  So I've been making slip covers, redoing furniture, and adding that ship lap look.  

This coffee table that I purchased was at a consignment shop in Greensboro for 66.00.  I wanted it to have that distressed look.  So I am using the same bucket of flat white paint, a can of black flat paint that you can get at Lowes for .99 and some boiled linseed that my husband already had in his shop....  

This is the table when I first purchased it.


It was a little somewhat scuffed up because it had been used. 
The first thing I did was sand it.  I used my husband hand sander and used a pretty rough grade sand paper because it needed to get the shinny coat on top off. 

This sand paper is really rough and it won't take near as long to sand it down and get that top coat off. 

 Next I painted the entire table white with the basic house flat paint. 
I was doing this late in the evening, I'm also redoing a rocker you can see in this picture but that post will come later.  Anyways, I let this table dry over night, but if you did it first thing in the am you could easily finish this project in a day.  
Next I re sanded again, to make the distressed look.  I sanded most of the white off the top but left the sides exactly how I wanted them to look 


These are much softer types of sand paper and was some my husband already had in his shop so if you had to purchase these it would probably add a little extra cost to the project, say around 5 to 7 dollars.  But I used this to do the sides so it would look distressed. 
I was gonna leave the top like this to continue on the project, and you can if you like it, but we really wanted to it show some character with dents and scratches so I went back sanded more of the white off and then took a chain and large hammer and we just laid it on the table and hit it hard to make dents all in the table. 
This is my sweet husband helping me with this part, it wasn't hard, but I think he just likes to hit stuff! LoL
Once the dents and bangs are made, you use the black flat paint to spray lightly over the dents.  
Next sand the black spots to where only the paint in the dent is left behind, unfortunately I don't have a picture of this because my husband grabbed the sander an did it before I could think to take the picture.  But this is the close up of some of the dents.
Ok, so once you have the black in a few places, your back to painting the white flat all over again.  After you do this you sand with the same softer paper on the places that you would like to make it look distressed!
I wanted to give the table a little protection but didn't want to use a strong polyurethane because I didn't want a shiny look to the table, so we used boiled linseed to go over it to protect it from water. 

I just used a old wash cloth and applied this all over the top of the table.  


I also made the little tray in the table but that's another post!


Sunday, March 6, 2016

FARMHOUSE DECOR 20 BUCKS OR LESS!


Hello World....

I have gotten terrible about posting like I should.  I have like a million projects going on and I'm trying to get them done and make post.  Which would seem possible if I would do one project finish it and then post it.  But instead because my brain wants to do about a million projects at one time it takes FOREVER for me to complete something.  So this weekend I'm working on a coffee table remake, sanding down my moms original rocker that she rocked us in as kids, going to Ikea to get ideas, making slip covers for my chairs that don't match in my living room, ect, ect... the list goes on and on.  So I have managed to get a few of these things completed but yet to be able to do the write up with them.  

Today I finished my farmhouse wreath and was able to FINALLY complete my pallet wall in my bathroom.  I'm really tickled at how it turned out and I only spent around 20 bucks! Yay!
First I went to my famous go to Store Hobby Lobby!! I purchased a wreath that was more vine like and was already wound together. It was 19.99 and was 50 percent off, getting it for 10.  I also purchased the flowers that I like that was simple and kinda classy each were 4.99 also 50 percent off, so they were 2.50 each.  I bought 4 of these.  This is how they looked separate.
I had already started to add a couple of the flowers before I snapped the picture of the wreath. 
This is once I had them all fished in and was ready to hang... This is something so simple and easy to do, like 15 mins but gives the sweetest country look to any wall.


Wednesday, February 24, 2016

EASY TO DO DISTRESSED PLANK WALL

At first I had no idea what to insert today for my post because I'm so far behind on putting stuff in that its unreal.  I have finished about 5 or 6 projects and taken pictures along the way but have been tired and haven't even known where to begin on which one I wanted to post.

So, I'm going with my Plank Wall Project.  For this project I can actually say and be very honest that it was pretty easy.  I am all about easy, as you can see from previous post.  I want to post projects that are easy so that others will be encouraged to feel like once I have taken a chance and flubbed through something that if I can make it so can anyone else!!


If you can use a tape measure, push a button, use a paint brush and bend over you are good to go!!! No, seriously that is all it takes.   Now I did have to borrow some tools from my husband and daddy to complete this project but if you have someone around that has a couple of tools, then you can do this.  Tools needed: a large round circular saw to make even cuts, a nail gun, paint brushes, tape measure, level,petroleum jelly. stain, white paint, and a pencil.  


This wall that I finished has a little special meaning behind it.  I had decided after looking through many pinterest boards that I could accomplish this project, told the hubs what I wanted to do, so I went to Lowes with him to pick out some other things for a "Fixer Upper" project we did(I will have those pictures in another post), picked out the other items but while I was there I checked out all kinds of plywood boards, all kinds and prices.  They range anywhere from 20$ for a 4 x 8 board up to 60$ a board depending on what kind of wood you want.  Well, I'm trying to keep my expense down, so I decided I wanted to wait and think over this thing and check with  my dad(the farmer) to see if we had anything laying around on the farm to use, because I love to reuse, recycle if you know what I mean.  So we left went bout our day and come home.  After coming in and staring at my wall I felt bummed because I wanted to do the project but didn't want to spend like any more than 50 cause I knew I wanted to be able to go to the almighty Hobby Lobby to get some desk decor later.


Well, I decided to take all the decor I had in there down, putty up the holes and just basically prepare the room for changes.  Especially since I didn't know what I was gonna do about the boards. I decided what ever I did that I didn't want to keep the red, so I went ahead and painted the office with some old grey paint that I had from another project so I still haven't had to spend any money. 

So, after deep thought I decided I was gonna go to Lowes to purchase the boards.  Right as I'm getting my pocket book to leave my dad calls and says he and my son Jonah was bringing me something from the farm. I said well I'm headed to Lowes and he says well hang tight there before you leave cause I'm turning in.  He brings me this huge, I mean huge box from where he had bought a combine auger 3 years ago before my Grandfather(the other farmer) passed away.  This was so cool because my grandfather would be really proud to know that I was able to use the box.  
 This is them coming in to greet my other son Isaiah and they are wrestling cause that's what they do.

Then below is the large, like I said, large box that he had and wanted to know if I could use it? What???? Can I use it......???   Like God is So So good!, No purchasing wood now (that comes later on the next plank wall, LOL)
So now all I have to do is take the cotton picking thing apart.  So we do, we get a crow bar, and hammers and saw and start taking the box apart. (Now this was not Easy, it is much, much easier to go to Lowes buy the big board and have the cutter at the back of the store to cut it into planks that makes nice and even boards. But I didn't do this for this particular project but I do on one that I will post later if you don't have old wood laying around. 


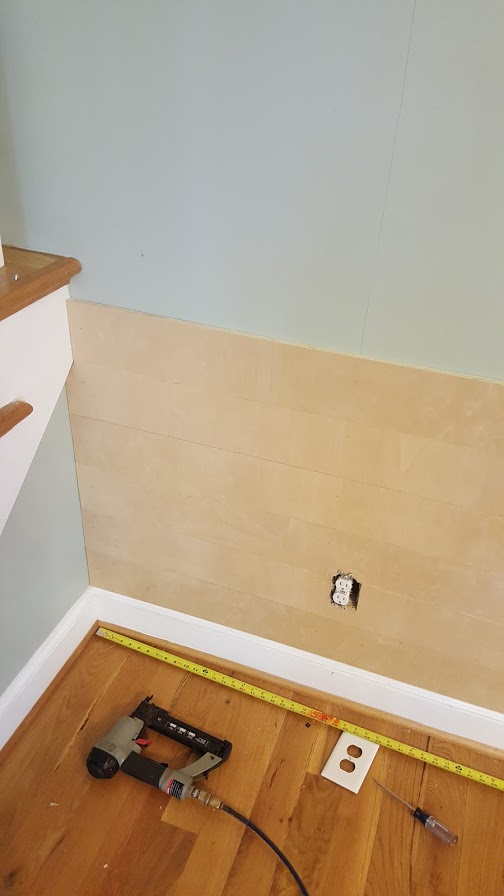
Ok, so once I had the pieces apart and ready for the circular saw, I brought them in one at a time and placed them in the floor to use a tape measure on.  Once I cut my pieces with the saw, I begin nailing them all up with the nail gun.  Now, if you have a stud finder this would be a good time to use one.  I don't use one, I use the old knock on the wall trick and if it sounds hollow I keep going till I hear a stud. But a stud finder will work great if u don't know how to do this. 

So once I was able to use the nail gun and slam all those babies to the wall it looks a little something like this. 
 As you can see from the first picture, I fixed the first one to the wall but before I kept going I did take a level and hold it on top of the plank to make sure it was level.
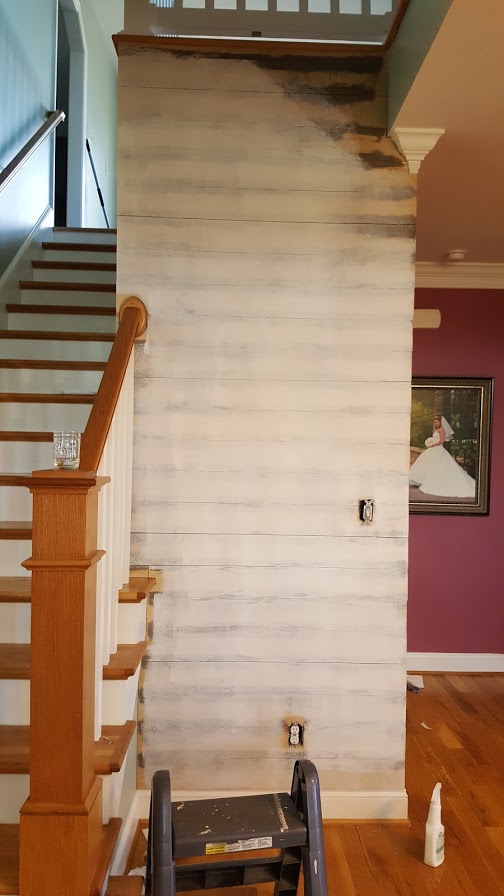
You can actually leave the wood as it is, or you can stain it dark, but I chose to use stain and white paint because I wanted that farmhouse white style. The first thing I did once I got all the boards nailed was to use a little bit of wood filler on the wholes that were really large, I didn't want to cover up them all cause I wanted that old barn effect. 

First I applied some Classic Grey Stain left from my pallet wall project and decided I wanted to have the lines in the planks to show through to give it the distressed look.

Once you paint the stain with a old brush be prepared to have paper towel in the other hand to wipe it down cause it will run a bit.  
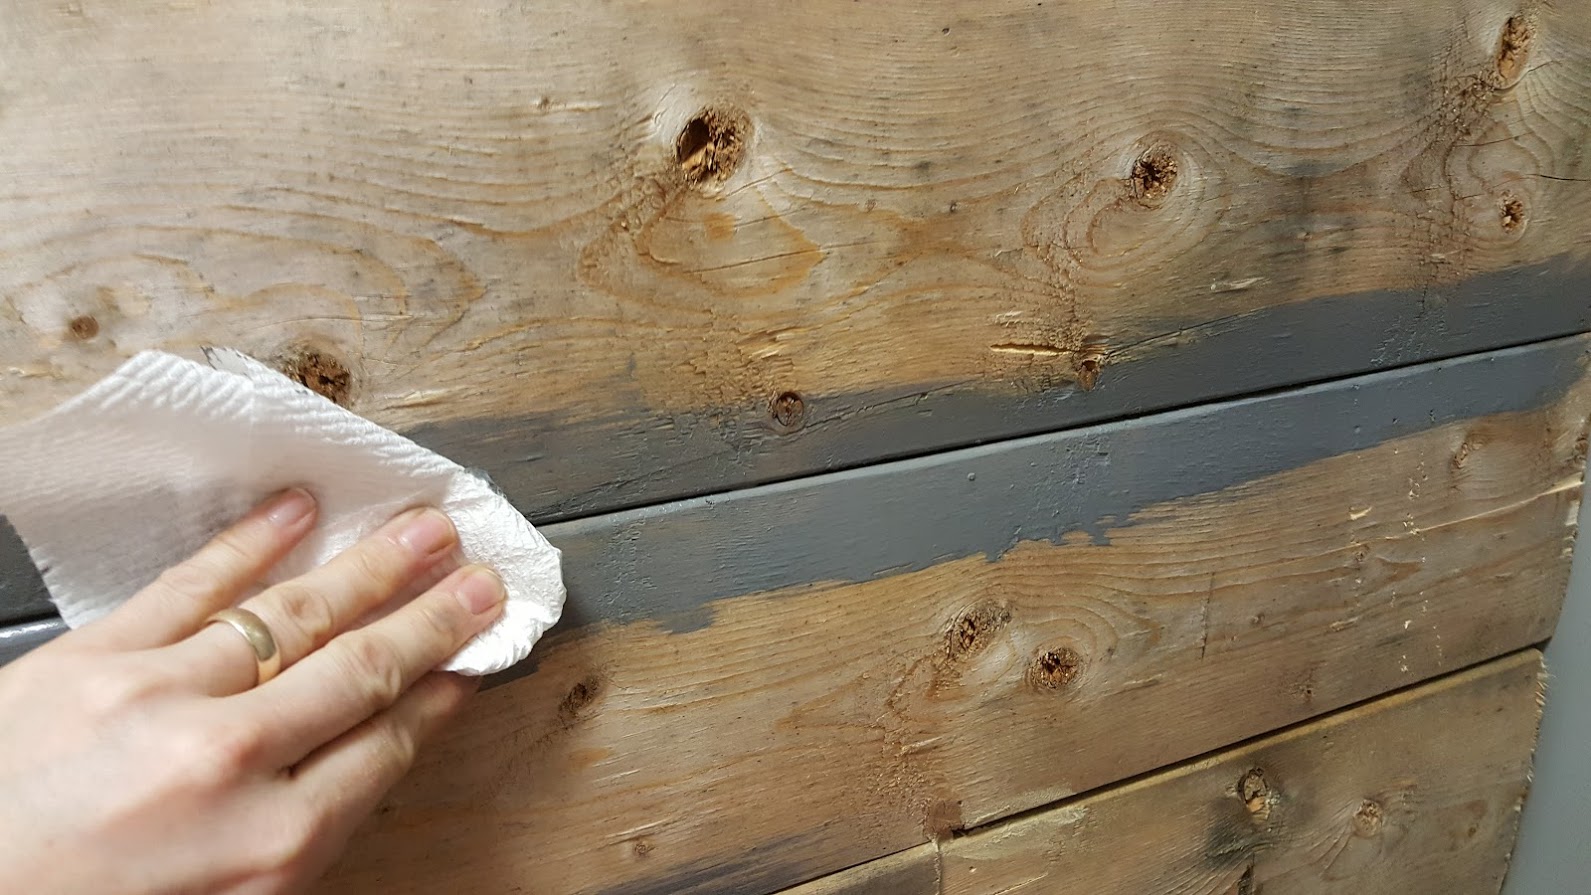
The next part is actually kinda funny.  After reading many blogs and DIY sites on how to do this most of them said you needed to use a Vaseline in the creases over the stain so once you paint the boards and sand them the stain will show through.  Believe me it is much easier to sand the places you want to have it show through if you use some kind of petroleum jelly substance.  I on the other hand couldn't find the Vaseline but with having 6 people in the house there had to something else that I could use without having to run to the store to get some.  So I used Preparation H.  Yes folks, that stuff works wonders and has many, many uses.....Who knew? But guess what it did the trick.  This is how I applied it. 
Once I had all the seams jellied up with the booty cream, I used a flat white paint for the wall.  Now you could probably use any old white paint even trim paint, but I already had a gallon of flat white paint left over from the house.  I painted the entire wall and let it dry for a hour.  
Once I felt like it was good and dry I went back and lightly sanded with a piece of old sand paper in the areas I wanted the grey stain to stick through.  
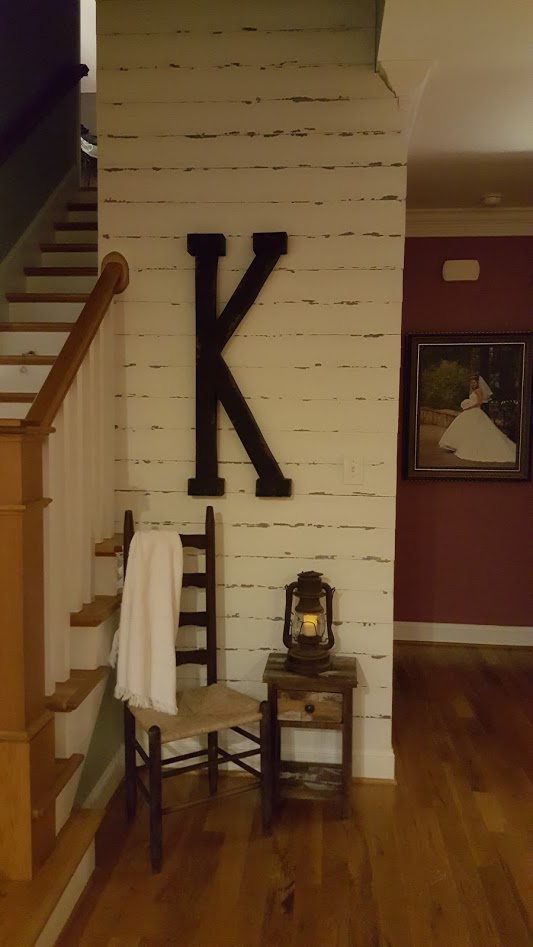
I really was please with how it was turning out!


I let all the work sit over night and cleaned it up the next day so I could add some of the decorations I had found and put together.  
My metal shelf, sign and metal basket came from Hobby Lobby.  The old frame with metal chicken wire was found in a old house we bought, I just cleaned it up and repaired the nail in it and stuck some magnets on it to hold notes or pictures.  Here is a extra picture:
Now I was able to do this entire project for  around 75.00 because the only expense I had was the decoration! So if you have this kinda stuff at your home you could do it for even less! Let me know what you think!