Thursday, December 31, 2015

PRIVACY CURTAIN---BATHROOM

Today, I'm posting more from my Master Bathroom.  My bathroom is not very large, but I consider it my little safe haven.  Its where I can go to get a few quiet moments if it gets crazy with the kids, I pray there (my war room is in there).  If you have seen the movie you know what I mean, if you haven't GO see the movie, its excellent!

So I like to take extra time changing it around or doing little special things in there, its a bathroom/closet.  When we built the house it was supposed to be a door into my bathroom, and then about 3 foot down and door into my closet from off my bedroom.  I said, "What, that's crazy?" So I had the wall solid just a door into the bathroom and then a opening from the bathroom into my closet, that way I don't have to walk out of my bathroom into my bedroom back into the closet to get clothes!!!! Whew, I'm tired now!

Hugh? Maybe I should have left it that way, more steps on my fitbit???? hahaha anyways, there was a plain opening there which was great, but sometimes, sometimes, we would forget to lock the door(oops) or my children would forget to knock, oops again.... And this mama was getting really frustrated over the wide open spaces, if you know what I mean.  So I decided with all this curtain project stuff going on that I would sew a little curtain that would give the bathroom a little style AND privacy, you know how I am about 2 birds, one stone right?  So I did the same that I did for my kitchen project with different material once again from Walmart and a tension rod.
I thought it turned out right pretty! I have another picture but its a little dark, still dreary and raining here. 
It matches the pallet wall pretty well too!

I added this little shelf after Christmas.  I love the ones on Pinterest and with all the pallet work that has been going on lately, I had thought about making one, but I didn't have to, this was a Lovely gift that my mother-in-law bought me for Christmas! Isn't it cute? I love it!

Wednesday, December 30, 2015

DIY CHRISTMAS TREE SKIRT

Are you wanting to change your Christmas Tree Skirt to make it have a little more country appeal but don't want to spend much?  That's always the name of the game for me anyways.  I went in a few stores and would see such pretty ones like at Cracker Barrel or just anywhere that would cost 30 or more.  I didn't really want to put that into it since we were trying to just pay for Christmas! So of course I improvised.  I went to the famous place I love, Hobby Lobby and purchase a roll of burlap, and a large K letter. Which you can also see in my kitchen from my turnip greens cooking post. Once I used it for this project I placed it in my kitchen as decoration.  (2 birds, one stone! YES!)


Ok, so anyways, I laid my old tree skirt face down and folded the burlap up on the edges.  I had to use a total of 3 strips.  Once I had cut the extra off I used straight sewing pins and attached it to it.  I didn't sew it on like I had planned because the original skirt was pretty nice and I figure if I ever get tired of the burlap I can just take it back off.  Once I pinned it all the way around I cut out the hole for the tree and basically like I was making a pattern made it the same size of the original skirt.  I took some of my daughters white acrylic paint covered my wooden K and pressed it into the skirt.  I loved the way it turned out for our little country Christmas tree, which was a white pine this year.  I also took some of the remaining burlap and made a wrap to go around the tree bowl to give it a finished look!
I think the roll of burlap was around 9, the letter was 2.50! Not bad for a new looking skirt.
What do you think?

NEED SOME FUN FOR KIDS ON A RAINY DAY?

Around here when it rains for days straight like it has (huff, huff) we need something fun for the kids to do.  Especially boys that drive you crazy when they can't run in and out of the woods to hunt.  Well, something for them to do when they are coming in to get dry from running in and out cause mine still do even when its raining, yay mom--:(

The kids like to run back and forth to the taxidermy shop because its at the end of our driveway, but even when things slow down up there and not much is going on in the house(in other words, mama is cleaning and they don't want to be found) they get bored and want something fun to do.  So we bring the hunting in doors.  We have always set up tents with them.  Inside and out.... but as little bitty ones the girls had this huge pink castle tent that they played with until it fell apart.  They would spend hours in it, watching movies, coloring or playing hide and seek.  My oldest is 12 and she still likes to play in anything like that.  So for Christmas this year the boys were given a deer blind so now that's what we do on a rainy day.  They put it up last night on the front porch, it was a instant tent, now today in the middle of the living room with sleeping bags its a instant club house.  So if your kids are driving you crazy because they are stuck inside you can try this, they will love it!


DRESSER/CHANGING STATION TO VANITY

This is another post that's kinda old.  I did this project back in the summer time but wasn't blogging at the time but did think to take a picture.  I love how on pinterest you can see all these old dressers changed into a sink by cutting a hole and sitting a vessel sink on top.  I really wanted to do something like that, but this was gonna be for my girls bathroom and of course they wouldn't take care of a antique dresser the way a adult would (makeup, fingernail polish remover, yikes!) so I decided to use something a little different.

When Kylah was born in 2003 it was very popular to get these dressers that had the changing station area built on top. It was long on one end, high up on the other to put a basket for diapers and wipes. It was really cool to use at the time with all 4 of my kids especially as a space saver cause the changing pad laid right on top.  Anyways, I decided that it would be neat to use this piece of furniture for them cause it was something that they had as a baby.
Not the best picture I know, but hey I wasn't blogging at the time and just wanted to take a before and after picture to see if it would turn out.  So I started off sanding it really really well to get the coating off the top so the paint would adhere good.  Once I sanded it, I cleaned it off with a old diaper cloth to make sure I removed all the sawdust.  I purchased black furniture paint from Lowes and started with a coat.  I let that dry 24 hours, lightly (I mean really light) sanded it again the next day and painted another coat of black.  My hubby bought some spray polyurethane from Lowes and we took it outside and sprayed a coat on it.  Waited 24 hours, lightly sanded and I brushed the polyurethane on this time.  I did this about 3 times to make the coats thick because I know how messy my girls are.  I still would like to go back and add another coat or two just to give it a great thick shine but I haven't done it.  We bought a vessel sink from Lowes for 80 and a friend of ours cut the hole for the sink.  So for the paint, sink, some new nobs(lowes) and polyurethane we have about 100 in our sink instead of 400 to buy a new sink and vanity, YAY!
We also had our friend to build a little magazine rack that matches the cabinet to put books in.  You don't have to do that, but it looks pretty cool, like a old milk crate.  We did purchase a vessel sink faucet, I can't remember exactly what it cost, but with that you could go as expensive as you wanted to depending on how fancy you wanted it to be.  We choose a little more modern one for the girls to make it look like young tweens :)  We had to use some small screws to hold the top drawer closed because of the hardware to the sink underneath, but the 2 lower drawers are still usable for pjs and what ever else you may would want to put in there.  
I bought all the hardware for the bathroom to match off of Amazon it was way way cheaper than Lowes.  It looks great and is very durable. Let me know what you think!

Tuesday, December 29, 2015

Some Good Ol Turnip Greens and "Debiled Eggs"

Ok, so yes I meant deviled eggs, but that's not what my Isaiah calls them.  He calls them Debiled eggs...and he Loves them.  I swanny I think he could eat a dozen all by himself.  After I got off my soap box today about being a good mama(see earlier post) I decided I needed to get outside and pick some turnip greens for supper.  We love the things.  I wanted to try a different recipe that Kylahs art teacher had told me about.  I have always cooked them with bacon or oil, but tonight I wanted to do something different.  We always have the same things when I cook them, cause they just compliment each other when you fix them together as a meal.  I have the greens, the eggs, cornbread, and mashed potatoes.  We sat down with it being cold outside to all this warm food and it gets quiet for only 5 mins.... long enough to take a deep breath.  So since the greens were so good I decided I would put this recipe in a post.  Now my amounts are gonna have to be adjusted if you are cooking for a smaller family.  Mine is for 6 people, but I also fix them to freeze cause we will eat them all year long until time to plant again next winter.  My greens still look good out in the garden and they are smaller this year so they are like baby organic greens.

They are so pretty and green even though the weather has been kinda funky!
Isaiah working to help me get the big cooking pot full!
The chickens waiting to get some greens too!
I bring them in and wash them... wash them really good cause they have dirt, bugs and grit in them.  I wash mine twice. 
Then I start the boiling. Be AWARE your house will start to stink, just a heads up if you have never cooked greens.  Its kinda hard on the measurements cause I fill my pot full when I'm picking but I would say its around 3 pounds of greens. But I've never weighed them to know for sure. 
I put them in a pot of water and bring them to a boil.  
Once they are boiling I add 3 tbs of salt and 1/2 cup of Cooking oil


 After they boil for around 20 mins I added 10 cubes of the Beef Bouillon.  This gives the greens a great flavor.  Once you have added all the ingredients and they are simmering, let them cook for around a hour time.  They will be good and tender.
If you were doing a smaller pot, that was say for 2 people I would only use around 3 cubes.  You can add them 2 at a time if you taste it along the way to achieve the taste you like.  My kids ate them up... Said they were the best greens we've had yet.... That makes this mama happy, especially since my oldest boy didn't really care for greens, but tonight cleared his plate!
If you decide to fix them let me know how they turn out!
Reciepe: If you are gonna freeze some
around 3 pounds give or take of greens
1.wash and clean them
2. bring to a boil
3. add 3 tbs of salt and 1/2 cup of veg oil
4. let boil for 20 mins or until they are withered.
5. add 10 cubes of beef bouillon
6. let simmer for 1 hour 


OUR LITTLE PAINTER

I'm so excited about having a little place where I can brag on my youngins.  Each one of our kids are showing different things that they are interested in as they get a little older and are blossoming into their on individual things they like.  We have a painter-artist, an inspiring singer, one that loves the taxidermy like his daddy, then one boy that just loves everything right now...2 that espescially like farming and being with his granddaddy anytime there is cows, or work involved.  We are proud of them all, but one at a time I want to start posting little things they do cause, if this is a site about being a MAMA and thats what I'm good at, then I must have braggin rights!

So today its dreary outside but at least the temperature dropped a little to make it feel a little more like winter.  Kylah decides that she wants to go spend a little time in her room on her new desk that Santa gave her and do some painting.  So thats what this post is about is the new picture that she painted.  She has been taking lessons around a 1 year, but she has been drawing and doodling as long as I can remember.  So here is her picture.
and Yes, I propped it up with my pot of turnip greens! lol But I do plan to do another post later about those! Anyways, How good is that wolf and his (smoke, as Isaiah puts it!) she is so excited about this, and I love that she has her heart wrapped in it.  She has many other pictures she has painted you can also see some of those on Instagram she has a board called paintforjesus! 

MUCH OF NOTHING

When my eyes opened this am I thought, "What will I blog about today?" As I felt bummed out cause I have other projects that I've completed that I could take pictures of and post I just couldn't really decided what to do.  I'm excited about this new blogging thing but yet I let little things like this overwhelm my mind.  Why as mama or as women do we do this to ourselves?  We put this mark above our heads to try to be on our game all time.  Hoping that someone will notice something we've made, something we've accomplished, something we did that was different, original, or just something of being noticed.  I for years have asked my husband over and over what is special about me?  How can God use me to make a difference?  I would do my normal whinny voice and say..."I stay at home, teach kids all day, cook, clean and then get up the next day to do it all over again, how can that be "Being Someone" for him!" I would talk to Him silently and ask why?

Ok, so my point is this, I would look at all the other busy people around me and say, "Wow they are a good teacher, painter, business lady, exercise queen, cook, sewer, creative person."  You know what I mean, like I would label people.  Say for instance as a example I would tell my husband, you have all these multiple gifts.  You are a top fireman(which he is cause he has awards to prove it, life saves and such) then he is a gifted taxidermist because he has been doing taxidermy since he was about 12 to 13 years old, he can dabble with the banjo, he isn't a professional in that area but is good enough to play at church occasionally.  I'm mean see??? Does any other mother feel my frustration?? I mean hey, I was in love with the fact that I was home everyday with my kiddos but on the other hand it was like I needed to be recognized by someone.  Why? Why do we do this, why do we feel this way? I would tell my husband, I can only dabble in everything I do, I'm not a perfect cook, cleaner, don't even get me started on the exercise part(huffs) are you kidding me, I mean I've had 4 kids, one which weighted over 10lbs(this body has road maps!),  crafter, teacher, musician (i like to mess around with a fiddle) or any of the above.  I would even cry at times and say how can God use me if I'm not really good at one particular thing?

So one day, I was listening to James McDonald at www.walkintheword.com its a really good pastor and his site, if you don't listen to him already, you should.  He was talking about how we all try to seek to see "who we are." That it even starts out young, for instance, are we the ball player, nerd, honor student, class clown? So we start out labeling ourselves at such a young age.  I was listening to this as I painted my bedroom. He talks about how to be really good at something, I mean good that the statistics say you must have had at least 10,000 hours of doing it!!! Did you hear that? I said, "Wow, the only thing I have that many hours at is just being a mama!"  As he goes on, he starts to talk about men and woman of the bible, Abraham, David, Mary, all these people that had issues way before God used them.  But He did!  So standing on that ladder I started to cry and realized that God had given me the best and hardest job that he could give to someone.  To be a mama and teacher to these kids.  Because believe me it is! Just as I write this my two boys are fighting with each other and fussing in my ear about how much they want to hurt the other one.  (frustrated face!)

So I don't really understand why I'm blogging, or why God has me doing this cause I've never thought of myself as someone who would sit down and right out things that go on in my home.  Actually that's why I'm not on face book cause I don't really like people in my business.  But yet I keep feeling this nudge to do this.  Maybe there is a frustrated mama out there just like me who needs to see that its ok being content right where you are.  I know that on the ladder that day, I realized that one day the fruit of this labor will show.  Its like I could hear his sweet voice telling me that it will all payoff one day and it will all be worth it.  To me that's better than any award, recognition, pat on the back for being the best crafter, cleaner, cooker, its just being a ruby as the book of Proverbs says, its being a God fearing, MAMA.  


Monday, December 28, 2015

HALL CLOSET PROJECT

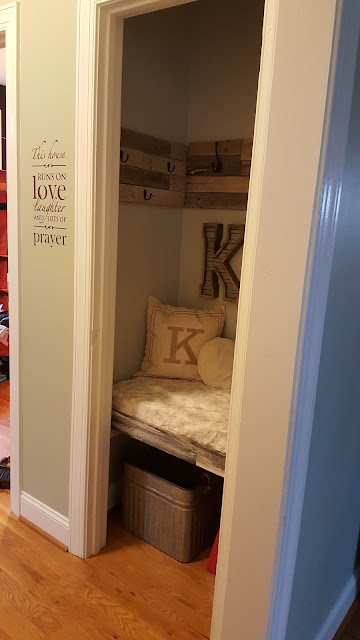
Ok, So does anyone out there really use a coat closet?  Well, maybe I should say does anyone out there with kids use a coat closet?  Cause basically I think they hold a lot of junk.  Mine did anyways.  I never hung the first coat in it.  I kept it closed cause I wanted to stick everything I could think of in there and hope and pray no one ever opened the dog gone thing.  I had only shelves, paint buckets, old vcr's (yes I said VCR) in said closet.  So I decided with the holidays coming up, and my hubby wanting to have company to come here this year (sigh, tired face) that I needed a nice cleaned out area for people to hang their coats and it be cute and not cost much to change.
So yes, you can see it looked bad... and yes it had shelves inside that I had to rip out. Which I must say was harder than I thought to remove! But I did get them out.  It was just your typical plain jane coat closet.  
So the first thing I did, after the ripping and roaring took place, was to clean all the mess up. And remove the spider webs, which I absolutely hate because the kids will tell you mama loves animals, all kinds but NOT spiders! 
So its clean, and the painting begins.  I used some old grey paint from where I had just finished my pallet wall project in my bathroom. Then once the paint dried, I added some pallets to the middle to give it a little country look :) and some plain hooks from Lowes Home Store.  
I moved the same shelves I had carefully removed from the top down to the bottom to give it the little seat for the kids to sit on when they tie their shoes.  I used a old chair cushion and recovered it with some cool looking material from Walmart.  Then I attached some of the left over pallets with the nail gun to give it a finished look. 
I was really tickled with how it turned out.  I did get a old tub, small stool and wall art all from hobby lobby. But with the coupon I think it was around 60 to 70 bucks.  The basket for gloves and hats came from Walmart.  The old lantern was one my husband had from long ago.  Here are some other views. 

This is the view from the front door.  I also have a little fake light that hangs in there that is battery powered so at night it looks like the lantern is lit.  So what do you think?

Sunday, December 27, 2015

CURTAIN DOOR FOR THE PANTRY ON A BUDGET

Ok, So I absolutely love, Love farmhouse style kitchens!  I want mine to be this huge thing you see on something like The Pioneer Woman or anything that you could find on pinterest, but lets admit it, that cost lots of moolah!  So I do what I can on a budget and try to make it as cutesy and farmhouse as possible.

Today I'm posting a picture of what I just recently made for my pantry opening because I had double doors there but of course when you have 4 children running in and out of them all day eating snacks or cooking the next meal, the door handles and doors stay dirty! So I was constantly wiping down or doing the handy man thing, like putting dead bolt locks or any other kind of locks we could try to keep them from sneeking and getting food when they weren't  supposed to.

Well, after the doors were left with holes and filthy looking I decided to sew my on little country curtains to give it that farmhouse appeal and keep the pantry from showing my clutterness to everyone that walked in and out of the house.
It was very simple to do, material and tension rod came from Walmart and was up within about 2 hours time.  

MY FIRST DAY

Well, I'm new to this whole new blogging thing... But excited to try and start to journal fun things about our family and hopefully learn neat things along the way.  It has been a crazy winter for us here.  The weather can't make up its mind if it wants to be hot or cold. Today its 75 degrees which is weird for us in December.  We were coming out to go to church and the frogs were chirping in the creek. So now we will have all these crazy viruses and colds going around because it hasn't been cold enough to kill all the germs that are going around.  Which leads me to my first topic.. GERMS....my husband "the taxidermist" is a germ-a-fobe! We must keep hand sanitizer in every location in our home, pockets, vehicles, ect.  This is a must! But i guess if you look at some of the things he looks at all day you would want to keep your hands clean? right? my 2 younger boys don't think so.  LOL

To explain a little bit about us, my husband works for the Greensboro Fire Dept every third day and then runs a full time taxidermy business that his grandfather started back in 1984. You can check out more about that at www.brokenarrowtaxidermy.com  I have 4 kids, 2 girls, 2 boys.  My oldest Kylah is 12, Emma Grace 10, Jonah 9, and Isaiah the baby is 6. (I'm not just the mother to the last one, I'm more of his attorney my husband says since I always come to his defense when things go wrong...hahaha) One thing you will learn about our crew is that we love animals.  All kinds of them.  What is really nuts is that I'm super, I mean SUPER tender hearted towards them. Which my husband thinks is wacky since he is a taxidermist, but yet loves me anyways. My sons on the other hand, do not share much of the same sympathies.  We do have rule here--you only kill what you eat.  So that way the boys understand we don't go around just killing any animal we see. It must be something that we are using that God provided for us to feed us. My boys have a excellent example set before them in their father. I do not even like any movies that has animals that get hurt, injured or dies in it.  I will not watch it, my husband has to watch those with the kids.  Even though I do love a good movie.

Sundays are always our relaxing day.  We both work in classes at our church Osborne Baptist in Eden, NC. and then come home and rest or play with our kids, then its diner at my moms every Sunday evening.  Christmas has wore everyone out and its actually peaceful in our home for 5 mins because everyone has something new to play with or they are asleep.  I have so many things I want to start to post or talk about! I can't wait to see how all this is gonna play out!

SOMEWHAT CRAFTY...I THINK

So I'm so excited about a project that I just finished in my home.  I had been researching on pinterest (oh, pinterest? frowny face, my husband says) and found all these walls that people had been doing in there bathrooms or just a neat area in the home with pallets.  So of course, I had to try it!

 I worried my dad (who is still farming and I bug like he has nothing else to do) to get me some pallets from one of the grain places he goes to sell wheat.  I told him I wanted really old ones that would look like they had come from an old barn.  We really like the white washed old barn style wood.  I wish that I had started blogging before I done this project that way I would have taken pictures along the way.  But anywho, I didn't so therefore I'm going to just post a picture and tell you what I done and then next time I will know better!

I had about 5 really old pallets, I had my tough as nails boy Jonah (who is 9, I have to brag, cause I mean dang, what 9 year old wants to run a pressure washer!) he washed all them and we left them out to dry overnight.  Next, my hubby and I pulled all the pallets apart and laid them out on plastic. I bought stain from your local Lowes Home Store, grey and whitewash colors.  We used a really cheap brush and just ran it over the boards until we liked the look.  The next day after they had dried, I used liquid nail and some black screws here and there and made my pallet wall.  I wanted my boards to be all scattered, in other words I didn't want each pallet to line straight up and down so I had to use different boards and make cuts based off where the last pallet ended.  The project took me most of the day because I was making all the cuts by myself.. But overall, I absolutely love the finished look because I have a beach theme in my bathroom so I didn't want the typical pine look.  I plan to hang something on the wall but haven't gotten that far with it yet.

So yay! I do like the way it turned out.  I think I spent around 25 for the total project.  Stain, liquid nail, and some cheap brushes.... I have some other projects I have done with the boards also that I will post soon!