Showing posts with label cheap decorations. Show all posts

Thursday, May 7, 2020

Farmhouse Mantels and Signs


Hey Y'all!
Hoping everyone out there is enjoying this beautiful day and sunshine that the Lord has blessed us with today.  I love the sunshine, it makes your skin feel warm and it so boosts my spirits! Today I just wanted to share about Mantels.  I love the fireplace.  Mine never looks the same very long.  
I love to change out the decor and have a different look, especially during the different seasons.  
I love love eucalyptus!  This wreath was so cheap and easy to make.  
Hobby Lobby will put its dried eucalyptus on one of their many sales and I purchased two bags and weaved it into this vine wreath I already had at home.  And the big plus is it smells soo good!  My Mema had
a bush here and she always kept it sitting out in rooms to make the house smell welcoming.  I plan to plant another one here this year because you really can use it for so many things.  
A lot of my decor comes from Hobby Lobby, but most of the wooden items you see were cooking things that my Mema used to make many meals for all us "heathens". So I have placed them up to remind me of her.  But the biggest shout out goes to the maker of my cute Agape sign.  If you need a custom sign I urge you to check out her mom's facebook page at Leah's Signs!
She does an amazing job AND I placed the order and had it in less than a week!  I love the word Agape. It means so much about the Amazing love that God has for us, which was in another blog post you can read about Here
I hope you have enjoyed this little post on mantels and please give Leah your support!


Thursday, October 27, 2016

Pantry Problems and Resolutions


Last nights post was all about the kitchen counters, walls and tile.  I have spent months trying to convert my kitchen into a more farmhouse style, instead of a woodsy rustic style.  So for today's post I'm showing the little dilemma that I was in, for my Pantry.  So I explained some before that I had a fridge that was crammed in a corner that, when I tried to open the door it would smack the wall.  It was the pits!  So after doing some measurements I figured that my fridge would fit in my large pantry, but I had to decide what I would do to frame around it.  At first I opened the wall all the way up as far as it would go.  Then re-closed it up with molding.  Which I ended up taking back down because I decided to use some old barn wood instead.  (sigh, it was very exhausting but very glad I did it)
So this is what I ended up with after I moved it and put the molding back up.  No more doors smacking the wall! Score! 

Ok, so now that I had all that arranged, the mess I ran into is because I had this big plan to hang one of those awesome barn doors(that we make ourselves) that slide back and forth. Well, since I was gonna have wood counter tops all the way to the wall to make more counter top space, I couldn't go with the barn door because there would be nowhere to slide it to open. Ughhhh!!

So now back to the drawing board! I looked and laid there at night trying to figure out what to do, when I decided, well if I can't do a barn door, I may just make the whole opening look like you are entering a barn.  Especially the ones on my papa and dads farm that we had when I was growing up.  They would use these old barns to cure tobacco and they had these old wood log openings.  So I was gonna try to duplicate that the best I could.
 So I started with attaching wood planks that my dad had from off a farm he worked on and a old screen door from a farmhouse.  I removed the old screen and put chicken wire in its place.

 I used a regular gray stain from Lowes to stain the wood.  To make it
really look like it was a entry way and to give it some special meaning to me, I took some old metal from one of my papas buck barns that we cured tobacco in and framed out the hole above the fridge.  I was so tickled with how it turned out!


All that was left was to make a farmhouse sign!


To make this sign I used a piece of very very thin plywood, cut to size.  I painted with black spray paint a couple of spots on the sign so that when I sanded it it would show through.  I then painted it with Lowes cheap .99 flat white paint.  I used my printer to make the letters the font that I liked, printed on bold and as much ink as possible.  I also set the printer settings to reverse so that when you lay it down on the wood the letters will be facing the same way.  I used a little cheap paint brush of my daughters and took water and went over each letter and let it dry.  When you do this it makes a outline of each letter on the sign like a stencil.  I took a small brush and black acrylic paint and went to work.  I used a very low grade sand paper and sanded over the sign to give it a distressed look.  I  used my dads skill saw to take the edges off of some rough cut wood and used them as my trim on the sign, using a nail gun.  And there ya go!


For my open shelves, I used some of Daddys wood again! What would I do without him.  He really loved coming in from work every day and taking a look to see what mess I had made for the day!
I cut the wood to the length I needed.  I bought some cheap brackets from Lowes, I think around 5 each and used a stud finder to place them.  Once they were mounted I could decorate.  


So its crazy, after all this work, this part for me was the hardest.  Because I didn't want to just stick any old thing up on my new pretty shelves!  So I started with getting 3 plastic jugs from Walmart for my flour and sugar.  I used a adhesive paper from hobby lobby and my printer to fix those.  Then I can list below what else I used incase you like them.
1. Tobacco baskets- from Decor Steals
2. Chop boards and metal tea, from a yard sale
3. white dishes, flower pot and silver ware rack from Ikea
4. rolling pin- family friend
5. green glass pitcher- my great grandma's
5. scale from Williams Sonoma
6. water pitcher was a glass one from Hobby Lobby, painted white
greenery for the fall is also from Hobby Lobby on sale.
Let me know what you think!
XOXOX
Hayley

What I've been Up To! Whew! Stuck in the kitchen!


Well World I must say its been a long time!  So much has happened since my last post that I don't even know where to start.  So instead of trying to list all the many many things I'm just gonna make a lot of post over the next few days to try and catch the blog up to date.  I have spent the end of the summer trying to finish my kitchen.  I had started showing different things on here that reflected a lot of my work in progress, but then once the cabinets, counter tops and painting took over it was so much work that I didn't get a chance to write.  Ughh... talking about a exhausting job.  But I can finally say that I'm finished and now on to different projects.  lol (my kids say no more projects till the first of the year, we will see :)

So basically I had already posted pictures of how I redid my island, that was in a previous post. I took off the counter top, added ambrosia maple planks and added ship lap to the bottom.

Then I knocked off all my tile on my back splash, replaced the sheet rock and continued the demolition on the other side.
Here are a little before photos:


 This will kind of give you a idea of what the kitchen looked like previously.  I didn't realize just how dark it looked until after I finished.  I had so many windows previously that I thought it "seemed" light.  Please excuse all the construction, dirty dishes and just crazy mess that you see in these pictures!

So now I can start to show you the steps.
I first knocked all the tile off the walls, this may or may not have been the nicest way to handle tile.  I kinda did it when my husband was gone to the fire dept. and lets just say he wasn't the happiest when he came home and saw the Gigantic holes in sheet rock! But no fear, I just grabbed some left over from the attic and cut and used sheet rock screws and replaced it once I cleaned up my mess.
So I was in a rush to get done that day, and this picture is horrible, but you get the gist.  
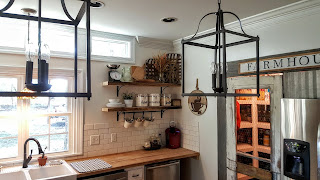
Ok so here you can see, I have taken away the tired old red, and the wonderful Pot Rack(which is for sale by the way if anyone is interested).  I have added old fashioned lantern lights and started to work on sanding the cabinets and whitewashing them to match my island.  

So once I finished my cabinets I decided to jump over to the pantry.  I loved how I had a huge amount of storage.  I didn't want to loose any of that, but hated how my fridge was stuck in the corner and every time I would open the door it would smack the wall!  Ugh... I hated it!!! So I decided to try and move the fridge over into my pantry and make it look like a built in.  But I wanted it to have a old barn look.  So once the hammering and ripping out starts, little helpers will appear. You can see here that Emma Grace decided that she wanted to help bust out some sheet rock. 
 Before you start thinking, she has lost her mind!!  I measured, measured again, and again to make sure all this would work.  I did all this work my myself and I didn't want the hubs to totally freak out, so I wait till he is gone to the station and then I begin to work! That way he doesn't freak! LOL which if he does, he is so awesome, cause I've only seen it once or twice and he does so much better than me.  Mine shows all over my face!!
 So then for 2 days I slide the fridge back and forth, yes, back and forth trying to just eat around it and work around it just to make sure I'm gonna like it and which side I actually want it to be on.  I end up deciding that I like it best on the right side.  And guess what? Both doors open and will stay open!!!

 So then its time to frame back up again.  So I go to Lowes, those people I think know me by name now.  Help me to make sure I get the right stuff and I frame it back up before he can see the mess!
Alrighty! You ain't gonna believe this, but once I did all this work, I measured for the door on the other side, cause I really wanted one of those nifty barn doors that slide that you see all over pinterest that people make look so easy.  Well, guess what?  You need a perfect wall for that.  No counter top coming down the side, enough wall space to allot for the door to slide back on.  It was a Mess!!! I'm so ill thinking I had this all planned out.  Well, I kept thinking.  I got back on the other side of the kitchen. I ordered my plank tops for the counters.  I then pulled my wonderful Ikea Farmhouse Sink out of its box! Yes, I could hear songs singing!
We work all afternoon, cause dang this thang is heavy.  I leave for VBS at church tell my hubby not to worry or work on it while I'm gone cause it is heavy.  But what does that sweet husband of mine do? He works on it.  Trying to have it in and ready when I get home.  (and score some brownie points at it!) Well, needless to say I get the dreaded call at church that this has happened!
 I can't even begin to explain the words!  Do you realize that Ikea is 2 hours away? Do you know how hard I've worked? These and many other thoughts are running through my mind.  (Madea, enough said)
 Ok, so since I'm at VBS and needing to teach kids, how Christ loved us and how we shouldn't want to murder our husbands in their sleep, I just prayed and said Lord, I'm not sure how this is supposed to turn out, but please help me.  The night went ok, I didn't loose it,  once I got home I had the sweetest guy, he was just in all honesty trying to help me.  But I didn't know what I would do.  I had bought this sink back 6mths ago..... This is how awesome our God is.  The next day I called the store and guess what? The week before this happened they changed the return policy from 90 days to 1 year?????? Can you believe this???? So me and my mom hop, that weekend, down to Charlotte and pick up and new sink! So I get it back and finally get it installed. Whew!! 
Now as you can see in this post, I have got the counter tops in, walls and cabinets finished.  The sheet rock has been replaced, but I did hire a neighbor who does remolding to insert the new windows that you see here.  They were longer, I ordered those from a building supply company out of Danville Va. that has awesome prices. I didn't want to try that, cause if a bad storm come up and the windows were laying in the kitchen sink, my husband would probably draw the line (hehehe, he loves me!) 
But as you can see its all coming together! So next was the tile.  I picked out white subway from Lowes.

Didn't really know much about laying tile other than I wanted to try it.  So I ask again my neighbor who knows how to do everything.  He came by, dropped off his wet saw, showed me by laying 2 or 3 pieces of tile and said call if I got in a pickle.  So that night I tried it.  It's not no where near as hard as I expected!  So the next day, I got it all up!

I was extremely happy with how it turned out!!!
So now to get my pantry fixed, light covers on, do my open shelves and decorate! 
To be continued !
See the next post to see how the Pantry turned out!

But this is the kitchen so far!


Wednesday, May 11, 2016

NEW WAY OF DISTRESSING!

I have been distressing some furniture here lately, coffee tables, rockers, glider rockers and end tables.  For the most part, I have used the same process for all of them, sanding, painting with a flat paint, wiping it down and then sealing them with a linseed oil because I wanted it to have a sealer on them but didn't want it to be shiny cause I wanted it to have a farmhouse old use look.  Well I tried this on a glider rocker that I had painted and it went horribly wrong.  What happened, you ask?

Well I tried doing the same process but I wanted to use a glossy paint so this glider rocker would be a little different and all the furniture wouldn't look the same.


This was the chair before I started working on it.  It was just a typical glider rocker that I had from when the kids where born.  It had blue cushions.
I didn't take a picture of the mess I made, I guess I should have but I was frustrated and didn't think about it.  The process was, I sanded it so the paint would adhere to it.  I wiped it down with a soft cloth and then used 2 cans of glossy black paint from Lowes.  Their generic brand .99 each.  Once I did this I used a sheet of the bendable sand paper and distressed it.  It looked pretty good so I then decided to add the linseed oil.  Big Mistake! I'm guessing where the glossy has a sealer or shinny consistency it wouldn't let the oil soak into the wood.  It was sticky!!!  I mean like GUM! Yuck!
It reminds me of the trick where u put nasty stuff on a pair of binoculars and leave it for a person to give them raccoon eyes, buhahaha! Let someone sit in this chair and get up with stripes.. LOL
Anyways, I said well gotta go back to the drawing board.  So I bought a can of Acetone from Lowes. 
I took a old wash cloth and started wiping down the chair to get the gummy mess off.  The more I wiped the more I liked the way the wood was looking old.  So I wiped and wiped it. Once I took most of the sticky off I sanded over it a little and then resprayed in a few places where it took off to much.  I ended up really liking the way it looked in the end so I didn't go back with any flat paint.  I never thought about painting it and then using acetone to strip it down to give it a distressed look.  


I puchased painters slip covers from Walmart.  They are around 17 each and I have used them to cover 3 different chair projects.  So I spent around 15 bucks on this project.  

This is a couple of pictures of other projects that I distressed earlier, but I did it the other way that I mentioned at the top.  I used flat paint and used the linseed oil to seal them.  I liked the way they turned out also.  These are the supplies I used for most of the projects.


First before and after is a end table I have had for years. 
 Sanded and ready for paint


Sanded after paint


 Coat of flat black on top and then sanded to distress.


This is the finished product.  You can see the arm of the lazy boy chair that was teal blue, yes teal that I recovered with the painters slip cloth that come from Walmart that I mentioned above. 


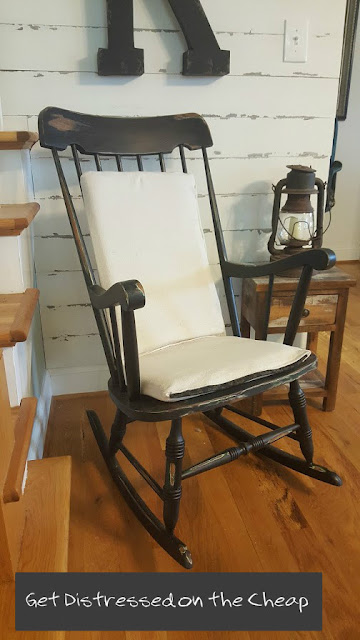
Another Project is my moms rocker that she rocked us in as baby's.  I wanted to incorporate that in my projects because it was Green... 
 This is when I started it. I had already sanded right much on it by the time I remembered to take a picture.  

I had painted it flat black and sanded it down, then painted it again.  


This chair had some old cushions, I also recovered those with slip cloth. This slip cloth has covered everything and it was only 17 Bucks!