Showing posts with label farmhouse style. Show all posts

Monday, May 18, 2020

White Subway Tile and Black Grout


Y'all! Is there not something about white and black that just screams clean! I can't help it, I love love white, black and gray.  I know these colors are and have been so popular for forever but I haven't been able to get around to posting any of my other pictures.  I have had a lot
of family and friends to come to the house and ask questions or the main thing they ask is, "Do you like your white subway tile and black grout?"  Well, I have to say Yes!
There is always gonna be pros and cons to everything.  But I must admit that out of all the different color tiles and grouts that I have tried over the years, (and I don't think there isn't a color I haven't had at some point) this has to be my favorite.  

In our house currently, I have a light gray grout in a half bath, and black in all the other areas that I have placed tile.  Let me just tell you. I will never go back to using white, or a light gray again.  Especially as long as I have children or pets.  We are on well water.  When you have well water no matter where you live you will have different types of stone or minerals based on where you live to be in that water.  Unless you are going to install a very expensive filter, some of those minerals will come through your water and stain things.  Here on this farm, my grandmother would deal with a hard water issue.  So sometimes the water has a red dark color to it.  This can stain your grout, especially on the shower floors.  I wanted to have subway tile in our master and in the kids showers, but I didn't want them to look identical. Silly me. So I used gray grout in the kid's bathroom.  Big mistake.  First of all, they are little pigs and not always the cleanest.  So, of course, they are gonna leave soap or shampoo that oozes out of the container all over the soapbox that we had installed in the wall.  This will cause you to have to scrub nonstop to keep it out.  And believe me, because the old spice body wash my boys lather in is bright teal! Y'all I ain't kidding either.  
The water has this reddish tint so can you imagine what that did to light gray grout?  It looked like someone had used the shower as a toilet and just never cleaned it.  It drove me INSANE! I have gone through my pictures a dozen times, I don't know why I can't find it cause I knew once I covered it I wanted to do a review. But I was a least able to find this picture where I had started regrouting and you can see the gray at the top of the picture. 


Please excuse the mess in their bathroom but regrouting is no joke! Also one helpful hint! For the walls adding the black grout over the grey worked just fine.  But on the floor after about two months the water started washing some of the black off.  So I had to take a tool from Lowes and go back and remove some of the grout and then re-grout again.  This time since I went deeper into the existing grout the new grout had something to adhere to.  So now their floor looks great.  Taking the old grout out took hours to do because the grout lines were small and I couldn't use a large tool. (whew)

You can see how light the grey is if you look at the top of the picture.  The black gives it much more defined lines, (which I Love!)


This is the kid's bathroom floor once it was finished. 
No More Ugly stained grout!

The white and black are very forgiving with stains and dirt, but now for the one only Con to having the Black grout... Its the soap and shampoo residue.  If you have a soapbox built into the wall of the shower or a seat like we have, then there is a chance that other people (of course not ourselves) will not wash all the soap or shampoo out of the shower once it suds up.  This will cause the soap to sit in those black grout lines and it will form a white dried area.  See below

Now, looking at these little pictures it doesn't look all that bad.  But when you have it all the way down the wall of the shower it doesn't look the hottest.  So I purchased this cleaner called Lime Away and it works pretty dandy to get the soap scum out.  I will say that I tried to take a picture to show you how it looked but because the white and black lines hide it so well it wouldn't show up on the camera without zooming in really really close.  This is the ONLY complaint I have about the black grout.  I have been living here for 3 years now and I still feel the same way.  I also used black in the floor of my bathroom with long gray tile planks. 
  This was taken before the bathroom was finished.  

So I hope this gives a little insight to using different color grouts and hopefully help if you are looking to use black grout in the future! 


Thursday, May 7, 2020

Farmhouse Mantels and Signs


Hey Y'all!
Hoping everyone out there is enjoying this beautiful day and sunshine that the Lord has blessed us with today.  I love the sunshine, it makes your skin feel warm and it so boosts my spirits! Today I just wanted to share about Mantels.  I love the fireplace.  Mine never looks the same very long.  
I love to change out the decor and have a different look, especially during the different seasons.  
I love love eucalyptus!  This wreath was so cheap and easy to make.  
Hobby Lobby will put its dried eucalyptus on one of their many sales and I purchased two bags and weaved it into this vine wreath I already had at home.  And the big plus is it smells soo good!  My Mema had
a bush here and she always kept it sitting out in rooms to make the house smell welcoming.  I plan to plant another one here this year because you really can use it for so many things.  
A lot of my decor comes from Hobby Lobby, but most of the wooden items you see were cooking things that my Mema used to make many meals for all us "heathens". So I have placed them up to remind me of her.  But the biggest shout out goes to the maker of my cute Agape sign.  If you need a custom sign I urge you to check out her mom's facebook page at Leah's Signs!
She does an amazing job AND I placed the order and had it in less than a week!  I love the word Agape. It means so much about the Amazing love that God has for us, which was in another blog post you can read about Here
I hope you have enjoyed this little post on mantels and please give Leah your support!


Wednesday, November 9, 2016

Homemade, Holidays & Special Gifts

There are so many things that are thrown at us for the holidays.  Gifts, gatherings, and special events.  I always am one of those people who look and look for that one unique thing.  I want something special for people that says, "Hey, I really thought about you and something you may like!"  Don't get me wrong I still do gift cards and gift certificates sometimes, but its nothing like having a gift that really looks cute, or is something that's different.  So what I'm working on now are the gift baskets that we displayed back for the fall, but incorporating Christmas stuff.  We have different ways or things that you can put in them to allow them to fall in different price ranges.  The one I'm displaying today is 18$.  It contains a microfiber hand towel, wire basket, candle, soap dish and a bar of my Cranberry Fig Soap.(you can chose from any scent)  We already have a ton of these on order for people because they wanted them for teacher gifts. You could do one smaller say 15 (towel, soap and candle).  Which, I would love to get considering I do homeschool my kiddos.  So if you need one, send me a email!  We also do a range of dollar baskets, so you basically could customize a order with what all you would like in your basket.  Hope you like them!


Sunday, November 6, 2016

"Get Naked Soaps & Signs"


The Sign that birthed the name!
I had been looking on Pinterest for a idea for a sign for my bathroom.  I had seen a couple here and there that I liked.  Ones that said different things.  I ran across a pallet one that said "get naked."  So I then go to take a shower and start laughing.  I thought, "Really, its kinda a cute idea cause dang, that is what you do in the bathroom!"
  So from there ideas started to bloom.  I have been making homemade soap all year.  I started back in the fall of last year making the bracelets and key chains, then moved onto soap.  I have always wanted to learn how to make homemade soap.  Back when I was a kid and my mom worked at a dentist office she would bring home some of the best homemade soap and I would love love to have it in my shower.  So after trying different ways and recipes I found one that consisted of the oils I really love to use on my face as moisturizers, Olive Oil and Cocount Oil!!! These are so so good for your skin.  So after working, trial and error I have finally come up with a line that I like.  My family really seems to like it so I decided to put it in a store in Eden.  Its on my Distressed Blessings facebook page, because I also like to make gift baskets, but I wanted the soap to have a name and I hadn't come up with anything.  One day I walk into my bathroom and the sign I made is hanging on the wall and BAM! I was like duh!!! That's it! The kids was like ooh gross MAMA! Their Daddy's says, "Hey, can you wash with your clothes on?"  We all start laughing and that's it! We decided it sounded like a good name.  

For the sign, I took the thinnest piece of plywood you can purchase, painted it with 99 cent cheap white paint from Lowes.  I used my Cricut to print out the black vinyl letters.  I used tobacco sticks from my daddy's farm, measured and nailed them with a nail gun to the plywood and Voila!  Who knew that so many ideas could come from just one sign.!


This is our display at Gabrielle and Riley a store you can find and purchase our soaps.  The soaps are 3.75 a bar. 
The scents listed there are:
Cranberry Fig
Baby Powder
Harvest Spice
Maple Syrup
Citrus Swirl
Oatmeal and Honey, with and without fragrance
Apple Jack
Rustic Woods and Rum
Energy
Green Apple
Pumpkin Pie
Almond Pound Cake
Anjou Pear
Cinnamon Spice
Sparkles and Spice


We also have a couple of Christmas Scents that will be ready really soon.  We look forward to starting this business and hoping that people will share our love for homemade soap.
We are making small gift baskets that you can order for the holidays.  Those pictures will be posted in the next few days! Thanks for looking! 


Tuesday, May 31, 2016

Ship lap style Island with Butcher Plank Top

Everyone has went Ship Lap Crazy.  At least a lot of the people I talk to cause of the farmhouse style that has been sweeping across Pinterest and other areas of design.  I absolutely love this style of decorating because it reminds me of my Mema's house.  She has always had the white walls and old furniture.  I am slowly but surly trying to change a lot of the old things I have into more of this style because I love the colors and this style of decorating.  

This kitchen project has been going through my mind for over a year.  I have sketched, used kitchen apps, and talked with people from all over trying to decide just how I wanted to make my kitchen look different but not spend a lot of cash. Especially since I stay home with the kiddos.  Which means that I must do most of the labor myself if I want to make the changes.  The kitchen is such a important room in the house so I have really tried to take my time in making decisions, which I'm still not done yet. So yes, some of the things on the walls dont' match, I have ripped the tile off the back splash ( wow, can you just say huge holes!) and its nowhere near done.  So for today I'm only talking about the island cause that's all that's finished right now.  


Let me show you how I tore the tile off of the bottom of the island.  
We had regular tile under the front side of the island and laminate on top.


 I started with using a flat head screw driver and hammer to loosen the tile which I was able to reuse these tile in a area outside that was always muddy and now we have tile to step on at the dog lot. (double use, score!)

 Of course I always have helpers when we do a job.  Isaiah working hard at removing the grout.

Once I removed it I was able to lightly sand it and then start adding the plywood that I had cut in 5 in planks.  These were a little wider than the original wall because I wanted a wide plank. I also wasn't going to do the distressed look on this.  I used pennies to place in between each plank so it would look like original ship lap was there.

I used a nail gun and a regular circular saw to cut and measure all the boards and attach them to the island except the front.

The front was a little different.  I have hickory cabinets and wanted to have a white wash finish but I also wanted the hickory to show through.  You typically don't see hickory cabinets whitewashed but I said hey, I will give it a try.  So I took all the doors off the hinges.
Please ignore all the pots and pans, I am trying to take the pots off my pot rack that hangs to keep the dust off while I work so they were all crammed in these cabinets. (yuck) 

Next I took the doors outside and lightly sanded them so that the stain would adhere.  Once I had them sanded I used some tacky cloth from Lowes to remove all the dust.  Once they were clean, I started staining them with White Wash pickling stain from Lowes.  I lightly covered them with a 2 dollar brush.  Once they were dry (after a few hours) I lightly sanded them again to give them a finished look.  This picture will be in the end with the top attached.  
Next I went to a awesome lumber yard in Mayodan, NC called Wall Lumber
There they spent a gracious amount of time talking with me and helping me to pick out the exact wood that I wanted for my top! I was so grateful because I knew once I bought this huge heavy piece of wood there was no going back.  So I ordered it and Bam in like 30 days it was ready for pick up.
I decided to go with Ambrosia Maple.  I thought it was beautiful.  I also had 2 legs cut from regular maple to help the top be very secure.
We centered the top on the bar. This was probably the hardest part, because if your floor is not level in all aspects you have to scoot the top around until you make sure all the edges are equal.  You shouldn't try to do this by yourself.  It helps to have a second eye.  

 We purchased a rotary dremel tool at Lowes to help cut the top.  We used my gas range top as a template and then attacked painters tape to the top because the man at Wall Lumber said this will help with top not splintering.  We both took turns cutting because this wood was almost 2"s thick and the tool does get hot.  Once we made pretty good size starting points we went with saws all to finish cutting.  (I don't suggest this) But after I had cut one side and he had cut the other we could get in with the saw and move much faster.  He is a really steady hand with it cause he uses it daily in his taxidermy shop, but typically you would just use a jigsaw and make the straight cuts.  


Once the whole was finished, we cleaned up.  I added the trim from Lowe's to the edges with the nail gun to give it a finished look.  You can get as wide with the trim as you like but I chose a inch wide trim and put it on each corner on both sides to make it looked more finished. I took a soft cloth and wiped over the front with Boiled Linseed Oil to Seal the cabinets.  I let that dry overnight.  I also used Boos Block Butcher block cream on my top and let that sit over night.  Once you get up and wipe it down it's read to use.  


We were very tickled with how it turned out!  Now what are we gonna jump on next?


Wednesday, May 11, 2016

NEW WAY OF DISTRESSING!

I have been distressing some furniture here lately, coffee tables, rockers, glider rockers and end tables.  For the most part, I have used the same process for all of them, sanding, painting with a flat paint, wiping it down and then sealing them with a linseed oil because I wanted it to have a sealer on them but didn't want it to be shiny cause I wanted it to have a farmhouse old use look.  Well I tried this on a glider rocker that I had painted and it went horribly wrong.  What happened, you ask?

Well I tried doing the same process but I wanted to use a glossy paint so this glider rocker would be a little different and all the furniture wouldn't look the same.


This was the chair before I started working on it.  It was just a typical glider rocker that I had from when the kids where born.  It had blue cushions.
I didn't take a picture of the mess I made, I guess I should have but I was frustrated and didn't think about it.  The process was, I sanded it so the paint would adhere to it.  I wiped it down with a soft cloth and then used 2 cans of glossy black paint from Lowes.  Their generic brand .99 each.  Once I did this I used a sheet of the bendable sand paper and distressed it.  It looked pretty good so I then decided to add the linseed oil.  Big Mistake! I'm guessing where the glossy has a sealer or shinny consistency it wouldn't let the oil soak into the wood.  It was sticky!!!  I mean like GUM! Yuck!
It reminds me of the trick where u put nasty stuff on a pair of binoculars and leave it for a person to give them raccoon eyes, buhahaha! Let someone sit in this chair and get up with stripes.. LOL
Anyways, I said well gotta go back to the drawing board.  So I bought a can of Acetone from Lowes. 
I took a old wash cloth and started wiping down the chair to get the gummy mess off.  The more I wiped the more I liked the way the wood was looking old.  So I wiped and wiped it. Once I took most of the sticky off I sanded over it a little and then resprayed in a few places where it took off to much.  I ended up really liking the way it looked in the end so I didn't go back with any flat paint.  I never thought about painting it and then using acetone to strip it down to give it a distressed look.  


I puchased painters slip covers from Walmart.  They are around 17 each and I have used them to cover 3 different chair projects.  So I spent around 15 bucks on this project.  

This is a couple of pictures of other projects that I distressed earlier, but I did it the other way that I mentioned at the top.  I used flat paint and used the linseed oil to seal them.  I liked the way they turned out also.  These are the supplies I used for most of the projects.


First before and after is a end table I have had for years. 
 Sanded and ready for paint


Sanded after paint


 Coat of flat black on top and then sanded to distress.


This is the finished product.  You can see the arm of the lazy boy chair that was teal blue, yes teal that I recovered with the painters slip cloth that come from Walmart that I mentioned above. 


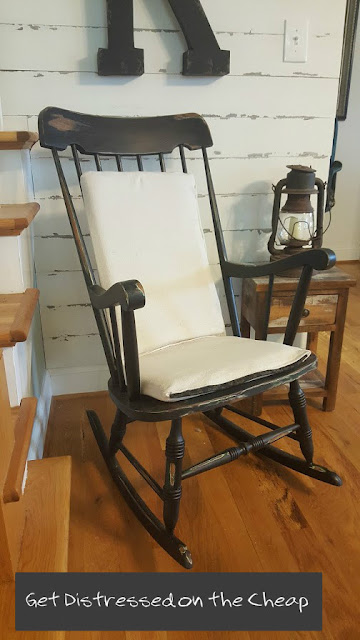
Another Project is my moms rocker that she rocked us in as baby's.  I wanted to incorporate that in my projects because it was Green... 
 This is when I started it. I had already sanded right much on it by the time I remembered to take a picture.  

I had painted it flat black and sanded it down, then painted it again.  


This chair had some old cushions, I also recovered those with slip cloth. This slip cloth has covered everything and it was only 17 Bucks!