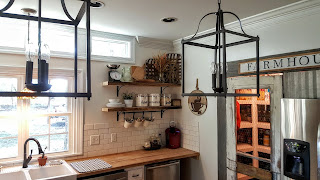
Last nights post was all about the kitchen counters, walls and tile. I have spent months trying to convert my kitchen into a more farmhouse style, instead of a woodsy rustic style. So for today's post I'm showing the little dilemma that I was in, for my Pantry. So I explained some before that I had a fridge that was crammed in a corner that, when I tried to open the door it would smack the wall. It was the pits! So after doing some measurements I figured that my fridge would fit in my large pantry, but I had to decide what I would do to frame around it. At first I opened the wall all the way up as far as it would go. Then re-closed it up with molding. Which I ended up taking back down because I decided to use some old barn wood instead. (sigh, it was very exhausting but very glad I did it)
 So this is what I ended up with after I moved it and put the molding back up. No more doors smacking the wall! Score!
Ok, so now that I had all that arranged, the mess I ran into is because I had this big plan to hang one of those awesome barn doors(that we make ourselves) that slide back and forth. Well, since I was gonna have wood counter tops all the way to the wall to make more counter top space, I couldn't go with the barn door because there would be nowhere to slide it to open. Ughhhh!!
So now back to the drawing board! I looked and laid there at night trying to figure out what to do, when I decided, well if I can't do a barn door, I may just make the whole opening look like you are entering a barn. Especially the ones on my papa and dads farm that we had when I was growing up. They would use these old barns to cure tobacco and they had these old wood log openings. So I was gonna try to duplicate that the best I could.
So I started with attaching wood planks that my dad had from off a farm he worked on and a old screen door from a farmhouse. I removed the old screen and put chicken wire in its place.
I used a regular gray stain from Lowes to stain the wood. To make it
really look like it was a entry way and to give it some special meaning to me, I took some old metal from one of my papas buck barns that we cured tobacco in and framed out the hole above the fridge. I was so tickled with how it turned out!
All that was left was to make a farmhouse sign!
To make this sign I used a piece of very very thin plywood, cut to size. I painted with black spray paint a couple of spots on the sign so that when I sanded it it would show through. I then painted it with Lowes cheap .99 flat white paint. I used my printer to make the letters the font that I liked, printed on bold and as much ink as possible. I also set the printer settings to reverse so that when you lay it down on the wood the letters will be facing the same way. I used a little cheap paint brush of my daughters and took water and went over each letter and let it dry. When you do this it makes a outline of each letter on the sign like a stencil. I took a small brush and black acrylic paint and went to work. I used a very low grade sand paper and sanded over the sign to give it a distressed look. I used my dads skill saw to take the edges off of some rough cut wood and used them as my trim on the sign, using a nail gun. And there ya go!

For my open shelves, I used some of Daddys wood again! What would I do without him. He really loved coming in from work every day and taking a look to see what mess I had made for the day!
I cut the wood to the length I needed. I bought some cheap brackets from Lowes, I think around 5 each and used a stud finder to place them. Once they were mounted I could decorate.


So its crazy, after all this work, this part for me was the hardest. Because I didn't want to just stick any old thing up on my new pretty shelves! So I started with getting 3 plastic jugs from Walmart for my flour and sugar. I used a adhesive paper from hobby lobby and my printer to fix those. Then I can list below what else I used incase you like them.
1. Tobacco baskets- from Decor Steals
2. Chop boards and metal tea, from a yard sale
3. white dishes, flower pot and silver ware rack from Ikea
4. rolling pin- family friend
5. green glass pitcher- my great grandma's
5. scale from Williams Sonoma
6. water pitcher was a glass one from Hobby Lobby, painted white
greenery for the fall is also from Hobby Lobby on sale.
Let me know what you think!
XOXOX
Hayley


No comments:
Post a Comment